


I’ve gotten many emails in which folks complained about how they couldn’t avoid using a Microsoft account when they got a new Windows 11 computer.
Initially, I wrote about how to do that in this post on essential Windows tips and tricks, where I mentioned that all you had to do was disconnect the computer from the Internet during the initial setup or when creating a new account.
While that trick still works, Microsoft has since made it so hard for folks to know when to disconnect the computer — the company wants you to create an account with it so badly.
And that brings us to this post where we’ll take care of this issue. But first, let’s find out briefly why you do not want to have an account with Microsoft.
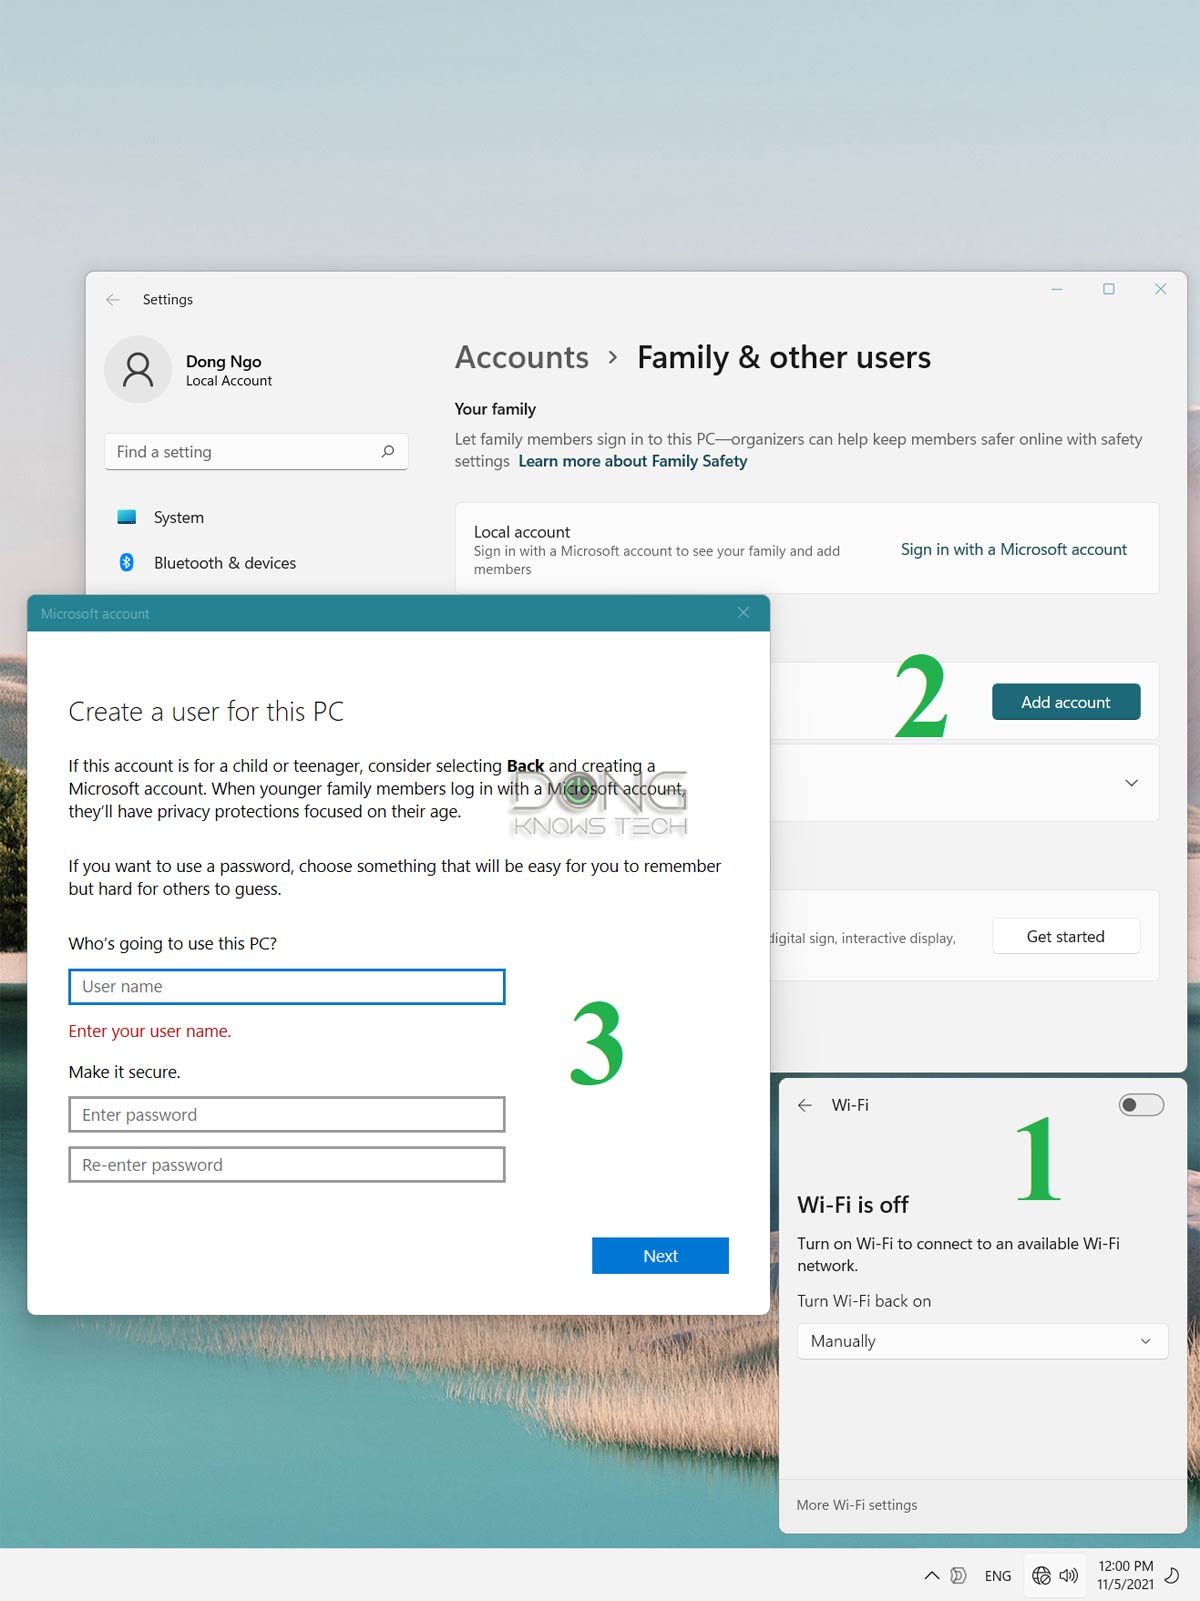
 Windows 11 Tricks: Turning the Internet off before making a user account in Windows used to be the easy way to avoid using a Microsoft Account. It’s no longer easy.
Microsoft account: Why it’s a raw deal
There are a couple of reasons why having to sign in with Microsoft before using a computer is a bad idea.
Your Privacy
First is the matter of privacy. You don’t want to “report” to the vendor what you do on your computer in real time.
Privacy is a matter of degrees, and Microsoft has different ways to track users’ activities. But with a login account, the data collection is complete and specific — it’s no longer fragmented.
With that account, the company can also push more of its dreadful services on the users, such as Team, One Drive, Skype, and many more.
Your security
Microsoft claims that with a login account, your security is better because the local login is tight to the online account, which is somewhat true.
However, the problem arises when that online account gets compromised. A party with bad intentions can steal your data or even remotely lock you out of your local computer or computers — all those you’ve used the same Microsft account to log in.
I’ve seen that happen many times. This type of “security” is a double-edged sword.
Your freedom to choose
And most importantly, users should be free to choose what they want to do with their computers.
Speaking of which, if you want to use a Microsoft account, you can always add that at any time — and I’m nobody to judge. And this post will help you with the option to start without a Microsoft account.
Microsoft account: How to avoid using one
From one official build of Windows 11 (and 10) to another, Microsoft has slowly made it so hard for consumers to avoid creating a new local user account that’s not also a Microsoft account. That happens when you enter an email address during the account-creating process.
It’s so hard that I’d recommend just following through with it when you get a new Windows 11 computer. The otherwise proves too much work.
After that, the following is how you can continue without that account.
The general direction
If you know Windows well, here’s my general direction on how to avoid using a Microsoft account when getting a new computer:
- Create the first account on the computer using a Microsoft account as prompted by Microsft.
- Log in to the computer with that account and use the command prompt to create a new local account. That account will not be linked to Microsoft.
- Use that new local account going forward and leave the Microsoft account alone, or you can remove it from the computer.
If the steps above are too vague, the next part will walk you through them.
Detailed steps on avoiding a Microsoft account on a new Windows 11 computer
These A-B-C steps apply to a new computer. If you have an existing computer running Windows 11 or even Windows 10, you can skip step A and get the same result.
A. Create a new user account as Microsoft suggests
Turn on your new computer and follow through with the initial setup process to create a new account as the wizard prompts. It will be a Microsoft account.
Log into that new account.
B. Create a new local administrator account using the Command Prompt
This step is the most important.
For this post, I’ll create a new account named Dong Knows Tech with Good4You! as the password.
Here are the specific steps:
1. Open the elevated Command Prompt
Run the elevated Command Prompt:
- Hit Win + S and enter the following text on the search field:
cmd
- As the Command Prompt appears in the results, right-click on it and choose Run as administrator (and accept the User Account Control security warning — click Yes). The Administrator: Command Prompt window will appear.
 How to run the elevated Command Prompt: Search for cmd in the search field, right-click on Command Prompt in the result and choose Run as administrator.
2. Create a new local user account
Enter the following command into the Command Prompt and press Enter (you can copy and paste then change the username and password to your liking):
net user /add “Dong Knows Tech” Good4You!
And that’s it. A new account named Dong Knows Tech is now created.
 Here are two executed commands that create a new local user account and turn it into an administrator on a Windows computer.
3. Turn the new account into an administrator
Executing this command (again, you can copy and paste and use the appropriate account name.)
net localgroup administrators “Dong Knows Tech” /add
Now the local account Dong Knows Tech is an administrator.
C. Use the newly created local account
Now log out of your current Microsoft account and log in with the new local account you just created.
The first time you log in, Microsoft will coerce you into turning it into a Microsoft account or accepting all sorts of services. Make sure you take your time to avoid those.
You can ignore the old Microsoft account now that you’ve gotten a local account. But if you want to remove it, go to Control Panel -> User Accounts -> Manage another account. Or you can use the following command syntax:
net user /delete username
The final thoughts
There are many ways to create a local account on the computer, but the above is the easiest.
By the way, if you’ve been using a Microsoft account and want to move to a local account, make sure you migrate your profile’s data to the new account first before getting rid of the old account. The migration process is the same on Windows 11 and 10, as explained in this post.
Wanna be in touch? Sign up for DKT newsletter!


Source by dongknows.com


