You’d think keeping tabs on your contacts would be about the simplest and most straightforward task imaginable in our modern connected world — wouldn’t you?
I sure would. But as I’ve learned over the years, that perfectly understandable instinct couldn’t be more inaccurate.
Effectively wrangling your contacts on Android and keeping ’em manageable, organized, and optimized for efficiency really is a fine art. And in a way, it’s no wonder: Most of us have reached a point where our phones’ contacts are a sprawling goulash of earthlings from all different eras of our lives — clients, colleagues, college buddies, and, of course, your cousin Carl from Poughkeepsie.
Making matters even more complex is the fact that what constitutes “Android” is a wildly different experience from one device to the next. And most Android phone-makers don’t exactly make it easy for you to make the most of your messy contacts stew.
The good news, though, is that it doesn’t have to be so difficult. Today, we’ll start from square one and get your contacts in tip-top shape, no matter what type of Android phone you’re using or how many unruly old bosses’ email addresses you’ve got stored away.
By the time we’re done, your Android phone contacts will be as orderly as can be — and you’ll be equipped with all sorts of practical knowledge for harnessing their typically untapped potential.
Part I: Android contacts streamlining
First and foremost, we need to make sure we’re all on the same page — ’cause as we just mentioned a moment ago, the Android contacts situation is anything but standardized across the platform.
Specifically, if you’re using a Samsung phone, we need to get you off of Samsung’s subpar and proprietary contacts service and into Google’s better, smarter, and more platform-agnostic alternative.
Samsung’s main goal with its products, y’see, is to keep you within its own universe. The company wants you to continue using Samsung stuff and buying Samsung stuff, and it makes that more of a priority than giving you an optimal experience.
The company’s Contacts app is the perfect example: The app offers no noteworthy advantages over Google’s standard Android Contacts service, and it’s available only on Samsung-made Android devices. It’s less fully featured and pleasant to use than Google’s version, too, and it makes it much more difficult to access your contact info from a computer or any other type of device.
So why does Samsung insist on making that the default contacts service on its phones instead of sticking with Google’s readily available offering? Simple: because it locks you into Samsung’s self-serving ecosystem.
Let’s break you free, shall we?
- Open up the Contacts app on your phone (the one probably represented by a glaringly bright orange icon).
- Tap the three-line menu icon in its upper-left corner, then tap “Manage contacts” followed by “Sync contacts.”
- Make sure your main Google account is present and has its toggle active on the screen that comes up next. If you don’t see it, tap the “Add account” option to add it into the mix.
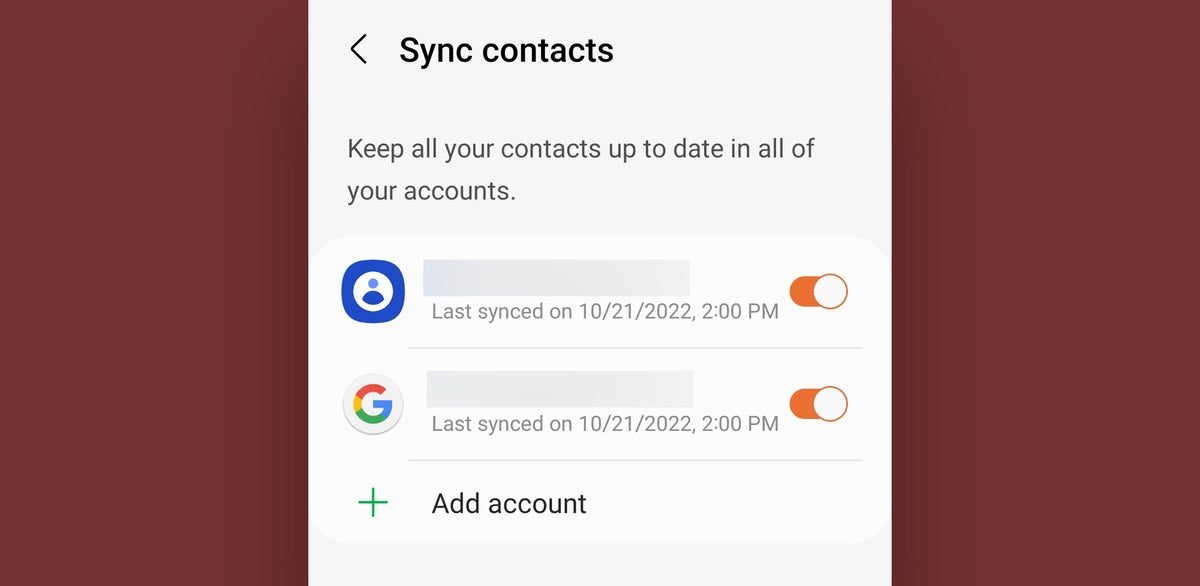
Both your Samsung account and your Google account need to be added and set to sync in the Samsung Contacts app.
Got it? Good. Now, go download the Google Contacts app from the Play Store. Open it up and approve the permissions it needs to operate. Then make a point to start using it instead of Samsung’s silliness (which, by the by, Samsung won’t let you uninstall) from here on out.
If you have a non-Google-made phone from someone other than Samsung, check to see if your contacts app is the actual Google Contacts app or not. If it isn’t — and if your device-maker gave you some other random alternative in its place — poke around in the app and try to find a similar set of options for syncing everything over to your Google account. If that isn’t possible, find the option to export your contacts from that app and then look for the import option within the Google Contacts Android app to get to the same spot.
Part II: Android contacts accounts and labels
Now that we’re all looking at the same place and dealing with the same best-available Android contacts management option, let’s take a few minutes to get the lay of the land, shall we?
When you first open the Google Contacts app on Android, you’ll see all of the contacts from whatever Google account is set to be the primary account on that phone. But take note: If you tap or swipe the profile picture in the app’s upper-right corner, you can switch to seeing contacts associated with any other Google accounts on the device — and if you tap the three-line menu icon in the app’s upper-left corner, you can shift into a merged view of all contacts from every account you’ve got connected.

The Google Contacts app makes it easy to see contacts from individual accounts or all of your connected accounts together.
You’ll also see a list of any labels you’ve created for your contacts in that area. Labels in Google Contacts work exactly like labels in Gmail: You can create as many as you like, and you can apply any number of labels onto any given contact. They’re less like folders, in other words, and more like stickers — or, y’know, labels — in that there’s no limit to how many any particular contact can have.
So why would you want to bother with labels, you might be wondering? Well, I’ll tell ya: They’re a splendid way to break that mess of mammals in your life down into specific, meaningful groups instead of always viewing ’em in one gigantic lump.
Maybe, for instance, you’d have a label called “Work” that includes everyone from your current company. And maybe you’d have a separate label called “Team” that’s even more narrow and shows only the people you directly work with. Maybe you’d have another label for clients, another for specific subsets of clients, and another for all the people in your life named Josh.
Once you do that initial organization, you’ll have an easy way to limit your view to only the individuals you need at any given moment — and you’ll gain a couple of other easily overlooked advantages, too, as we’ll explore further in a moment.
First, to apply a label onto a contact once you’ve created it:
- Press and hold the name of the person from the main contact list.
- If you want to add other people to the same label at the same time, tap their names next.
- Once you’ve got all the names you need highlighted, tap the three-dot icon in the app’s upper-right corner and select “Add to label” followed by whatever label you want.

You can add multiple contacts into a label at once by using the Contacts app’s multiselect capability.
Capisce? Capisce. Now, let’s move on to some even more advanced Android contacts goodness.
Part III: Advanced Android contacts enhancements
When you first tap a person’s name within the Google Contacts app on Android, you’ll see a screen with their profile appear.

Anyone you store in your contacts on Android will have a custom profile that puts all your notes and info about them in a single place.
Tap the pencil-shaped editing icon in the upper-right corner of that area, and take note of some important possibilities:
- In addition to all the basic info you’d expect, you can tap a plain-text “More fields” link at the very bottom of the profile editing interface to reveal a whole host of other potentially useful options — including fields for phonetic pronunciation of the person’s name as well as any nicknames, their company name, department name, work title, and even a series of people related to that person that you might need to remember (spouse, assistant, manager, or the person who referred them to you, just to name a few available options).
- After tapping that “More fields” option, you’ll see a new option at the bottom of the screen to add your own custom field. That’s a handy way to store any additional manner of info about a person that might be helpful to find later — anything from their shirt size to favorite restaurant or anything else that might come up in your future interactions.
- If you tap the circular icon at the very top of the profile editing interface, you can upload a photo to represent the contact in question. That photo will then show up all throughout different Google services on any device where you’re signed in — in Gmail, the Google Messages app, even Docs and Drive when you share or collaborate. (If someone has a Google account, you may already see a photo for them in that area. But you can still override their own photo with one of your choosing, if you’d like.)
One more advanced Android contacts option worth mentioning: When you open any person’s profile in the Contacts app on your phone, you’ll see a hollow star in the upper-right corner of the screen. You can tap that to fill the star in and mark that person as a favorite.
Doing so will have some significant effects:
- That person will always appear at the top of your contacts list.
- They’ll also typically show up in a special, more prominent area of your Phone app for extra-easy access (and if they don’t, try downloading the Google-made Phone app and using it in place of whatever alternative your phone’s maker preinstalled in its place).
- And they’ll be granted special privileges to reach you even when your phone is in Do Not Disturb mode, with the specifics depending on your preferences in that area of your system settings.
Part IV: Android contacts optimization
One of the best features of the Google Contacts service is how easy it makes it to clean up and optimize your contacts collection.
From the Contacts app on your phone, tap “Fix & Manage” at the bottom of the screen — then:
- Tap the “Merge & Fix” button.
- Look to see what suggestions the app gives you, then tap ’em one by one and follow the steps within.

The Google Contacts app offers intelligent suggestions for quickly cleaning up your contacts.
Google Contacts will identify any instances where it looks like you’ve got two separate contact entries for the same person and then offer to quickly combine them for you. It’ll also let you know when it’s found more up-to-date contact info for anyone in your list. And it’ll offer to add in entries for anyone you email often but haven’t yet added.
Easy peasy, right?
And last but not least, for the virtual icing on your Android contacts cake…
Part V: Android contacts actions
Once you’ve gotten your contacts created, organized, and cleaned up properly, the Google Contacts app on Android has several advanced actions that are all too easy to miss.
- You can use the Contacts app as an efficient way to start a new group email or text message thread with any selection of people you want. Just make sure the people are all in the same label, then tap the three-line menu icon in the app’s upper-left corner and select the label. Next, tap the three-dot menu icon in the upper-right corner of the label screen and look for the “Send email” or “Send message” option.
- The Contacts app can also serve as an all-in-one hub for initiating communication with anyone in your collection. Open someone’s profile, and you’ll see one-tap icons for calling them, texting them, emailing them, or starting a Google Meet video call with them — all without ever having to poke around in any other apps.
- If you want even easier access to certain high-profile people, check out the Google Contacts widget options: Long-press on any open area of your home screen, select the option to add a widget, and then look for the Contacts section. There, you should see an icon to add a new overall contact shortcut (which will zap you directly to a person’s full profile) as well as an icon to add a one-tap command for calling or texting any particular person. You can add as many of those as you want onto your home screen and even drag ’em on top of each other once they’re there to create convenient folders.

The Google Contacts app’s widgets are a wonderful way to keep one-tap shortcuts for calling or messaging important people close by.
- Speaking of calling convenience, if there’s a certain contact who calls you a little too often — an overly eager recruiter or maybe that blasted cousin of yours (come on, Carl!) — the Google Contacts app has an easy way to automatically route all of their calls directly to your voicemail. Just open the person’s profile within the app, then tap the three-dot menu icon in the upper-right corner and look for the “Route to voicemail” option.
- That same menu also holds a speedy shortcut for setting a custom ringtone for any contact so it’s especially easy to identify them (or hide in the nearest underground bunker) whenever they call.
Last but not least, the real beauty of the Google Contacts setup on Android: It works equally well no matter what type of device you’re using.
On any phone you move into in the future, you can simply install the Google Contacts app, if it isn’t already in place, and all your stuff will instantly be there, synced, and available to you — no restoring required. And if you ever want to poke around or update your contacts from a computer, all you’ve gotta do is pull up the Google Contacts website in any browser where you’re signed in.
So the Android contacts situation isn’t exactly straightforward, as you’ve seen. But once you get it under control, it absolutely can be easy and effective — and, with a teensy bit of advance planning, an important piece of your mobile productivity puzzle.
Copyright © 2022 IDG Communications, Inc.
Source by www.computerworld.com


