Location tracking is a tremendous feature on iPhone and Android, but the data is also easily abused. Privacy-conscious smartphone users will probably want to limit the collection of precise location data as much as possible. Apple’s iPhone has features that allow users to protect their privacy. These include the ability to use fake geotags for iPhone photos you share with others to protect the real location of those images.
It’s easy to manage the Camera app’s access to location data on iPhone. It’s also easy to remove location data from individual photos or groups of photos. And you’ll need to follow the same easy steps to add fake location data to photos before sharing them with others.
Disable the iPhone Camera’s access to location data
There are valid reasons for adding location data to photos, and the Camera app can do it by default. That is if you agreed to allow the app to access your location data when you set up the iPhone. Or by going into the Settings app at any point thereafter.
But you should know that the location data will travel with any shared photos if you choose not to remove it when sharing images. As GadgetHacks points out, anyone could access that location data once the photos make it to social media.
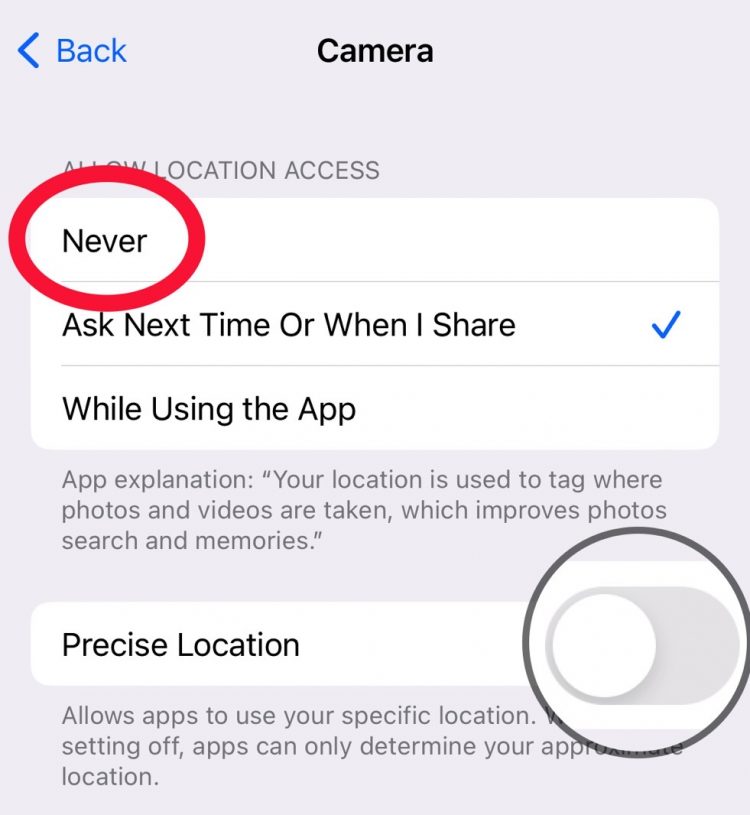
How to change the iPhone Camera’s access to location data. Image source: Chris Smith, BGR
The easiest way to block location information from iPhone photos is to go to the Settings app and disable access. Head to the Privacy & Security menu, look for the Location Services menu, and then scroll for the Camera menu.
In it, you’ll want to disable Precise Location. And you can also set location access to Never. In such a case, you don’t have to worry about creating fake geotags for the iPhone photos you want to share.
The problem with this method is that you’re not benefiting from location data that you might want to have associated with most photos. Thankfully, there are ways to fix that.
Delete location information from individual iPhone photos
If you want the Camera app to add location data to all your photos, you will ignore the step above. Instead, you’ll want to develop another habit: removing geotags from photos when sharing them with others or posting on social media.
Head to the Photos app, open the share menu, and then tap on Options. In it, you’ll find a Location toggle that you can turn off when sharing. This ensures the geotagging information doesn’t leave the phone.
 The Options menu lets you delete location data from iPhone photos in the Photos app. Image source: Chris Smith, BGR
This works with photos and videos and multiple selections. It might be tedious, especially when sharing content in a hurry. But this habit will protect your privacy in the long run.
There’s another step that lets you delete the actual location information from specific photos and videos.
Tap on an image in the Photos app in iOS 16 and look for the Adjust Location menu. This will open a menu that lets you select a No Location option for the photos and videos that don’t need location data. In iOS 15, you’ll have to swipe up on the image to reveal the metadata. Then look for the same No Location menu in the Adjust menu.
The good news is that the same steps will let you Revert the location information for those photos and videos.
 The Adjust Location menu in the iPhone’s Photos app lets you change or fake geotags for photos and videos. Image source: Chris Smith, BGR
Finally, the step above lets you add fake geotags to photos and videos. The point of the feature isn’t to falsify location information for your photos and videos. iOS simply lets you to add data to photos and videos in case you forgot to enable geotagging. As I said, location information can be valuable for all sorts of reasons for the iPhone owner.
But if the feature lets you add real location data to iPhone photos and videos, it means you can also add fake geotags. Nobody will judge you or stop you from doing it.
Head to the same Adjust Location menu as described in the previous step. Then use the search bar to add a new map location. You’ll find suggestions appearing below the search bar, and you can select the one that meets your needs.
This step works when selecting a single photo, video, or multiple items.
As before, the good news is that you can revert to the actual location of the photo or video with the fake geotag. Just look for the Revert button in the same menu.
The same steps in this guide work in iPadOS when sharing images on the iPad.
More Apple coverage: Check out the best Apple deals online right now.
Source by bgr.com


