PowerShell gives you all the control you need over your Windows PC, and it’s easy to learn. So ditch Command Prompt and use Windows PowerShell commands to automate those repetitive administrative tasks.
Learning PowerShell will also teach you how to handle most Linux administrative tasks inside the bash shell. PowerShell is similar to what you find in most Linux Distros.

What Is PowerShell?
Windows PowerShell is a command-line interface and scripting language developed by Microsoft for system administrators. But you don’t have to be an admin or programmer to use it because it is much simpler than other programming languages. It is similar to regular English, and everyone can understand it and use it to administer their computers.
The commands used in Windows PowerShell are known as “cmdlets.” They will let you activate a specific action, or series of actions, on your computer. These actions can be simple, like logging into a wireless network, or more complex, like automating specific repetitive tasks.
To open PowerShell, press the Start button, type “powershell” into the search box, and select Windows PowerShell. You’ll open to the command-line interface, where you’re ready to start typing commands.
In this article, we’ll go over ten of the most useful and easy PowerShell commands.
1. Get-Help
The Get-Help cmdlet is a great place to start in PowerShell. It provides an overview of what you can do and is also great when you need more information on a particular cmdlet.
Simply open the PowerShell window and type Get-Help. This will open up a comprehensive overview that will teach you what PowerShell is, and you will understand its functionality and structure. You also can access the web for more advanced help files directly through the interface. You can download these files for later use.

But that’s not the end of the get-help command. Type:
Get-Help *
PowerShell will list all the cmdlets you can use at that moment. The list will probably be huge, and you don’t need to learn all the displayed cmdlets. But feel free to read them and explore all the possibilities available to you.
Type:
Get-Help <command name>
You don’t need the brackets, simply type the name of the command you are interested in, and this cmdlet will give you the basic info about it. For an even more detailed explanation of a command, type:
Get-Help <command name> -Full
If you need an example of how to use a certain command type:
Get-Help <command name> -Example
2. Get-Command
Do you want to retrieve information about a specific command, or set of commands, quickly? The Get-Command cmdlet will do that for you. There are so many options within Get-Command, but you, as a basic user of PowerShell, don’t need most of them. Here are some basic cmdlets that will be helpful, especially when navigating the available commands.
If you want a list of specific cmdlets of the same type:
Get-Command -<CommandType>
For example, this complex phrase will order your computer to display a list of all cmdlet type commands available and to sort them by alphabetical order of the noun in their name:
Get-Command -Type Cmdlet | Sort-Object -Property Noun| Format-Table -GroupBy Noun
This is an excellent example of a more complex command that will make PowerShell execute a complicated task. Once you understand the syntax, you will see that using PowerShell is often the fastest and easiest to get some things done on your computer.

If you want to find a specific command by its name, simply type:
Get-Command -Name <name of command>
If you don’t know the exact name of the command you’re looking for, but you know part of the name, you can type:
Get-Command -Name <name of command> -UseFuzzyMatching
This cmdlet will task your computer to find commands that closely match what you typed in the <name> field. You also can use this cmdlet if you are prone to misspellings and don’t want to be bothered with correcting yourself all the time.
3. Get-Content
If you want to see the content of a file, use the Get-Content cmdlet. You will need to specify the exact location of the said file so your computer can find it.

In the example above, you can see the content of a test text file made for this purpose. This is a straightforward command, but if you know what it does, you can combine it with other commands and perform really powerful tasks through Windows PowerShell.
4. Get-Process
The Get-Process cmdlet will give you information on currently running processes on your computer. You can see the memory usage, CPU cycles, process ID, and other attributes.
If you add the name of the process to this cmdlet, you can see the information on a specific process. For example, if you want information on the Discord application process, simply type Get-Process Discord.

You can start or stop processes through PowerShell by simply replacing the “Get” prefix of the syntax. To start a process, type:
Start-Process <process name or ID>
To stop a process, type:
Stop-Process <process name or ID>
5. Get-Service
As a system administrator, you may find the Get-Service cmdlet very useful. This simple cmdlet will display all the services currently running on your system and allow you to control them. This means you can see all the programs currently working to make your computer run.

Now you can use the service name to control it. Use commands such as Restart-Service <service name> to unstick the frozen ones, Stop-Service <service name> to stop them completely, and Start-Service to start them again.
6. Get-Item
If you need a specific item, it might be faster to find it through PowerShell than by using a search bar integrated into your operating system. It is especially convenient if you know the location of the file you need. Simply use the command in this way:
Get-Item C:
This will bring you the list of files in the “C:” hard drive. You can be even more specific and search in all the directories under the user’s profile or go deeper into the “documents” or “downloads” directories. To do this, type:
Get-Tem C:users<user name>*

If you need to retrieve a child item from a container, such as a system directory, you can use the cmdlet Get-ChildItem. This command will show you all the files and directories inside that container. As with the Get-Item cmdlet, you will need to specify the container’s path.
To delete items, you can replace the ”Get” suffix with “Remove.” This will allow you to delete everything, from files and folders to registry keys and functions. Type Remove-Item <location name>. You can elaborate this cmdlet and delete only hidden and “read-only” files or delete items from specific folders and subfolders.
7. ConvertTo-Html
This command will help you convert a .NET object into an HTML file that can be displayed in Web browsers. This is an output cmdlet which means that it works great with other cmdlets. Simply add it to the end of other cmdlets and include a specific file path.
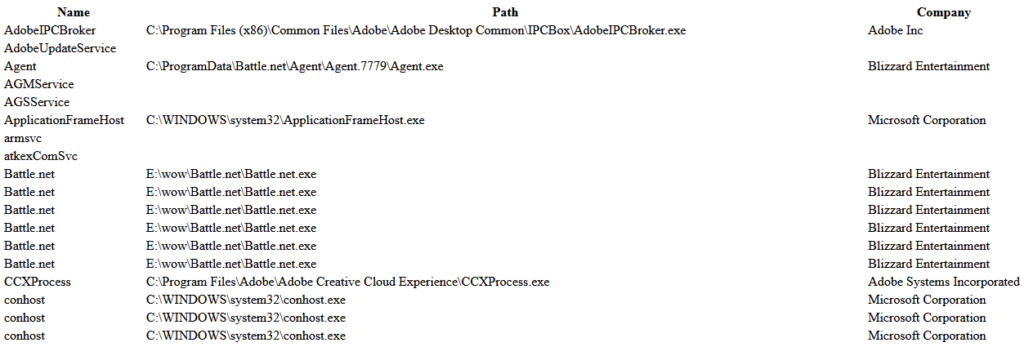
For example, if you want to create an HTML file that displays the name, path, and the company of all the current processes of a local computer, type:
Get-Process | ConvertTo-Html -Property Name, Path, Company -Title “Process Information” | Out-File filename.htm

Replace filename.htm with any file name you want.
To open the created file, use the Invoke-Item cmdlet plus <file name.htm>. The contents should look something like the image below.

8. Set-Executionpolicy
If you want to run local PowerShell scripts, you will have to change the execution policy of the PowerShell itself. On Windows computers, the execution policy is always restricted, and you will need to change it to RemoteSigned or Unrestricted. On non-Windows computers such as Linux or Mac, it is typically set to Unrestricted, and it can’t be changed.
If you want to learn more about the PowerShell execution policy, simply type:
help Set-ExecutionPolicy
The PowerShell will display the help files about execution policy on your computer or notify you if there are none. But it will also provide you with a link that you can follow and read about it online.

To set the policy to RemoteSigned, simply type:
Set-Executionpolicy RemoteSigned
To set it to Unrestricted type:
Set-Executionpolicy Unrestricted
To check the current setting for the execution policy, type:
Get-Executionpolicy

Because execution policies are part of PowerShell’s security strategies, it will ask you for confirmation of the change. Type Y only if you are sure you want to proceed.
9. Select-Object
This command is used to select objects and sets of objects, unique objects, and objects in a specific position in an array. There are different parameters that you can use to specify the objects you want to select. Among them are properties, numeric values, and specific input objects.
To select objects by property attribute, you will need to specify the attributes such as name, ID, or CPU. You can even group the attributes, but you must separate them with commas when typing in the command. To see the Select-Object cmdlet in action type:
Get-Process | Select-Object -Property ProcessName, Id, CPU
The PowerShell will list all the current processes and their attributes, as shown below.

You can now use the -EpandProperty command to get detailed information about the specific attribute. If you want details about the Modules property of the ProcessName attribute’s type:
Get-Process Chrome | Select-Object -Property ProcessName -ExpandProperty Modules | Format-list
The “Format-list” output of the command is there to make the results formatted and readable.
10. Export-CSV
Sometimes the PowerShell commands result in long lists, as we saw with the Get-Command cmdlet. Long lists and lots of information are difficult to read, and you will want it in a more organized manner. To do this, export all the data into a CSV file. You can do this directly in PowerShell by using the Export-CSV function.
For example, we saw that the cmdlet Get-Command gives us a long list of all available cmdlets we can use in PowerShell at that moment. You can combine the Get-Command and Export-CSV to create a detailed list with comma-separated values such as name, source, and version that apps like Excel can recognize.
To do this, type the following command into the PowerShell command prompt but note that you can set any path you want, and you can name your file differently:
Get-Command | Select Name, Source, Version | export-csv D:AllCommands.csv
You can now open the list in Excel, and you should see something similar to the following image.

Source by helpdeskgeek.com


